
It’s true that you will get some very unflattering portraits with an external flash if you don’t know what you’re doing.
However, it’s easy to learn these few simple tricks that make a huge difference in the results. Flash photography is not as hard as many natural light photographers tend to think. Start using these tips now and you’ll be surprised how quickly you can improve your images!
Flash photography tips: bounce flash techniques
The idea is that you bounce the flash off a reflector, wall, ceiling or even a mirror – spreading the light out over a much larger area and effectively increasing the size of the light source.
This lightens dark shadows and produces softer, smoother and more natural lighting than direct flash. For the best results, tilt the flash head up to at least 60°. The downside is that subjects can look somewhat flat and lack that ‘sparkle’.
Bounce flash photography can also produce unwanted shadows underneath a subject, which in the case of a portrait accentuates eye bags and creates shadows under the nose and chin. It also significantly reduces flash power, which typically translates to a light loss of two to three stops.
As long as the flash sensor’s still pointed towards the subject a TTL flashgun will automatically amplify its output to compensate for this, but if it can’t meet the new requirements you must increase your aperture, boost your ISO and/or move in closer to your subject.
If you’re using a manual flashgun you’ll need to increase your exposure accordingly.
Another important consideration when bouncing flash is that the surface you bounce off must be a neutral white, otherwise your subject will end up with an unnatural colour cast.
Flash photography tips: white bounce cards
Bounce cards are a great way to add a vibrant catchlight to a subject’s eyes and to fill-in any resulting shadows – for the most effective results, tilt the flash head up to 90°.
Some advanced flashguns feature dual flashtubes instead – firing a weaker burst directly at the subject to fill in shadows and add a catchlight while the main flash is bounced upwards.
If your flashgun doesn’t feature a bounce card or dual flashtube, try using a rubber band to secure a piece of white card around the back of the flash head to reflect some light forward.
Conventional bounce flash won’t always be practical – you might be working outdoors. And if you’re indoors the ceiling/walls might be too distant or the wrong colour.
One solution is to buy a mini flash reflector that clips around the flash tube and bounces the light forwards, softening it with minimum loss of light. Try LumiQuest’s Big Bounce, Pocket Bouncer or Midi Bouncer – available with different coloured metallic inserts.
Flash photography tips: using flash diffusers
A flash diffuser is a good alternative to bounce flash and works in a similar way by spreading out hard, directional light into a larger, omni-directional source.
This minimises red-eye, weakens shadows and creates softer, more flattering lighting. Taking diffused flash off-camera enables you to create even more natural results.
You can buy various types of diffusers for external flashguns. High-end flashguns often ship with a translucent diffusion dome, which looks a bit like a plastic ice-cream carton and fits snugly over the flash head.
If you don’t have one, try the white, green and gold Sto-Fen Omni-Bounce diffusers, which are available for different makes and sizes of flashgun. LumiQuest makes a similar device called the UltraBounce and a built-in pop-up flash diffuser called the Soft Screen.
For a dirt-cheap substitute, tape some tracing paper or soft tissue over your flash window.
Flash photography tips: wireless flash
Nikon and Canon’s wireless TTL flash systems allow up to nine ‘slave’ flashguns to be controlled and fired simultaneously via a ‘master’ flashgun on the camera. The remote slave units can be divided into three distinct groups.
Flash mode and flash output level compensation values can then be set separately for each group and the master unit. If you want to use all your flashguns remotely you can control them via an infrared flash trigger on the camera’s hotshoe.
Being able to position several units anywhere up to ten meters from the camera has many benefits. Most importantly, you’ve got the freedom to create natural looking lighting that eliminates shadows and emphasises the subject’s form, texture, tones and colours.
You can also illuminate dark backgrounds, highlight secondary elements, cast coloured lighting – the possibilities are practically endless.
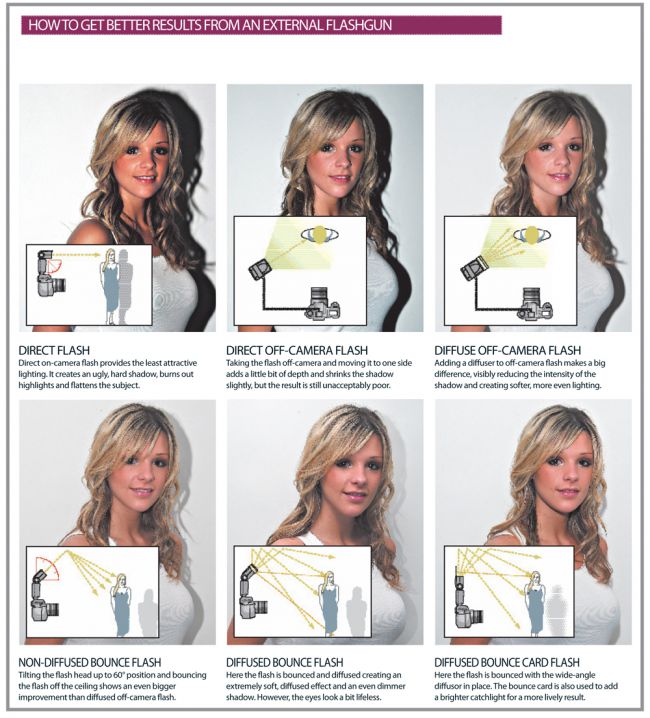
Hover over the image and click right to save this flash photography cheat sheet!
Read the full article with even more tips over at Techradar.
Source: Techradar