
This article over at Digital Photography School explains what all those mysterious letters on the mode dial of your camera mean.
The sooner you start teaching yourself how they affect your image, the faster you’ll improve your photography. It may seem complicated at first but I promise you, as soon as you figure out the Manual mode you’re never going back to Auto again.
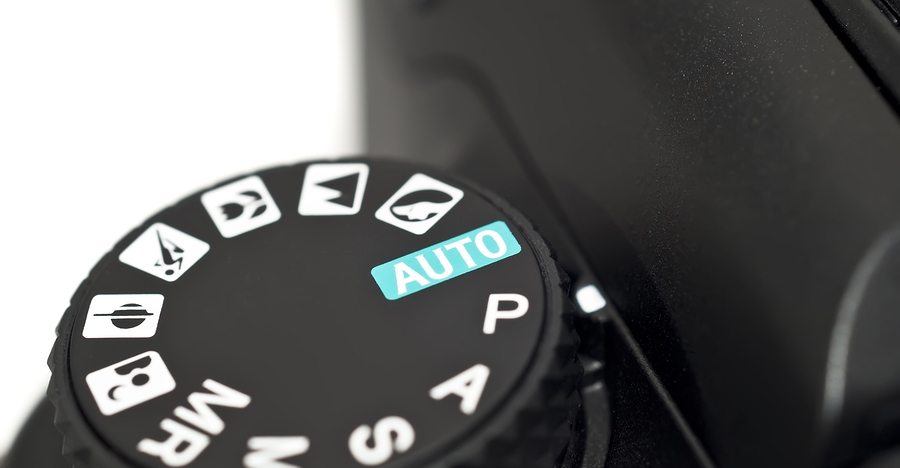
P: Program Auto Mode
When you want to branch out from Auto mode, this is a good place to start. Program Auto does exactly the same thing as the familiar, comfortable green Auto mode, but with a twist – you can change a few settings if you want. Using Program Auto allows you to do things like decide whether you want the flash to automatically pop-up or turn off altogether, as well as change the ISO and the White Balance.
In Program Auto your camera will always try to maintain a properly-exposed picture, but you can use the dial to change the aperture and shutter speed at the same time. It’s a fun way to experiment with your camera while being reasonably certain that you will still get good pictures, and also start to notice some of the effects that changing the aperture and shutter speed has on your final images.
Av (or A): Aperture Priority Mode
When you want to have full control over the aperture in your lens (and thus also control the depth of field), this is the mode to use. It lets you turn the control wheel on your camera in order to adjust the aperture alone, while the camera decides what ISO (if you use auto ISO) and shutter speed to use.
If you have plenty of available light this is a fantastic mode to be in, because you can choose whether you want a wide depth of field (i.e. everything in focus) or a shallow depth of field (just your subject in focus, with foreground/background elements blurry) and know that the shutter speed and ISO will be set automatically to get the shot you want. However if you are shooting in low light, you might end up in a situation where you set the aperture you want, but your camera chooses a shutter speed that is too slow, or an ISO (again only if you are using Auto ISO, if you are manually setting the ISO you will still have to adjust that yourself) that is too high for your liking.
Tv (or S): Shutter Priority Mode
In this mode you tell the camera what shutter speed to use, and let it calculate the aperture and ISO (when using Auto ISO). It is particularly useful if you are shooting fast action like a race or sporting event, because you can set your shutter speed to be fast enough to freeze the motion of the subjects, and know that your camera will select whatever aperture and ISO values are needed to get the shot. Most cameras can shoot as fast as 1/4000th of a second which is plenty for freezing motion, or as slow as 30 seconds, which can be fun for nighttime photography and capturing light trails.
M: Manual Mode
This is the granddaddy of all camera modes, because you have to choose all three settings: Aperture, Shutter Speed, and ISO. Shooting in manual can be a little scary at first, but the trick here is to learn to use your camera’s light meter, which will tell you if your picture will be over, or under-exposed. When you put your camera in Manual mode, the control wheel will only change one parameter of the three aforementioned settings at a time, so you may need to press another button while turning the wheel, or navigate to one of your camera’s menus in order to select a different value.
Preset Program Modes
(look for the mountain, flower, person or sports figure on your mode dial) If you are perfectly happy shooting in Auto mode, but get frustrated when it doesn’t always give you the results you want, you might want to try using one of these instead. If you like going outdoors and taking shots of landscapes, twist the dial away from Auto, and over to the mountain icon, which will force your camera to use smaller apertures and lower ISO values that are suited for this type of photography. If you are watching your kids play football or run around at the park, use the icon with a person running, which will make your camera use faster shutter speeds and higher ISO values, if necessary, to freeze the action.
A-Dep: A fully automatic mode that lets you pick two points (in the foreground and background) that you want to be in focus, and your camera selects the aperture needed to get everything between those two points in sharp focus. The abbreviation stands for Automatic Depth of Field and it’s fun to play with, but doesn’t always work out so well in practice.
Box with Lightning Symbol Crossed Out: Another automatic mode that also disables the flash. It’s good if you want to shoot in low-light situations and only use available light, but your pictures may come out grainy or blurry.
Read more about the camera modes over at Digital Photography School.
Source: Digital Photography School
Second, and surprisingly common, are situations when you’re photographing subjects which are intrinsically light or dark, like a wedding dress or a black cat. Your camera has no idea what it’s looking at and just hopes everything is a kind of average grey tone, so this is where you need to take over to make white subjects look properly white, and black ones properly black.