
If you’re just starting out with night-time photography, this tutorial will come in handy for you.
Rusty Parkhurst over at Improve Photography has some great tips for you, from choosing the right equipment and location, to finishing the images in a photo editor. Folks – we have some sleepless nights ahead of us!
Camera
A basic, entry level camera will work just fine. Granted, the better your camera is at handling noise at higher ISOs, the cleaner the images will be, but don’t let noise stop you from giving this a try. The important thing is that you have a good understanding of how to use it, particularly in manual mode, since that is how you’ll be shooting.
Lenses
Generally speaking, you will want to use “fast” lenses for night photography. In other words, lenses that have very wide maximum apertures, such as f/2.8, f/1.8, or even f/1.4. The wider the aperture, the more light that the lens will let in to the camera’s sensor. On the other hand, if all you have is the kit lens that came with your camera, that will probably work, too. Many entry-level camera kits come with an 18-55 mm lens, which has a maximum aperture of f/3.5 at its widest focal length (18 mm). Although you may have to bump up the ISO to increase the sensitivity of the sensor to light, that will work just fine for making star trail images.
Tripod
A good, sturdy tripod and ball head are going to be imperative for any type of night photography. When photographing the stars, you are going to have shutter speeds measuring in the seconds, so hand-holding won’t be an option.
Cable Release
It would be great if all cameras had a built-in intervalometer, but camera manufacturers seem to enjoy torturing us photographers by leaving basic features out of some models, and putting them in others. My first DSLR (the Nikon D7000) had a built-in intervalometer. When I stepped up to the full frame Canon 5D Mark III, guess what? No intervalometer. Really!? If you don’t have this feature on your camera, then you are going to need a cable release.
A Headlamp
My preference for a light to use on night shoots is a headlamp. This gives you light when and where you need it, but also keeps your hands free to do other things. You may have heard that using a red lens on your light will help to preserve night vision. There is some controversy as to whether or not this is true. Regardless of which color you use, it’s a good idea to use it only as much as necessary and turn it off to let your eyes adjust to the darkness and to prevent contaminating the scene with unwanted light.
As a general rule, your aperture will be set as wide as possible for the lens you are using. That leaves shutter speed and ISO to achieve the desired exposure, but before making those final adjustments, let’s frame up the shot and make sure you are getting a desirable composition. Since it is dark, it will be hard to see to compose the shot. To make the process easier, I set my ISO very high (as much as 8,000 or even 10,000). These shots will be noisy and maybe overexposed, but all I’m looking at is the composition. I will also use a shorter shutter speed so I can speed up the process of capturing an image, adjusting the camera position, and re-shooting until I get the composition that I want. With the composition set, I will tone down the ISO to around 1,000 to 1,250 and set a shutter speed of 30 seconds. Take a shot of two to see how the stars and landscape look and also zoom in on the LCD to make sure the image looks sharp. Don’t forget to look at the histogram since it will be difficult to judge exposure just by looking at the image on the LCD screen in the darkness.
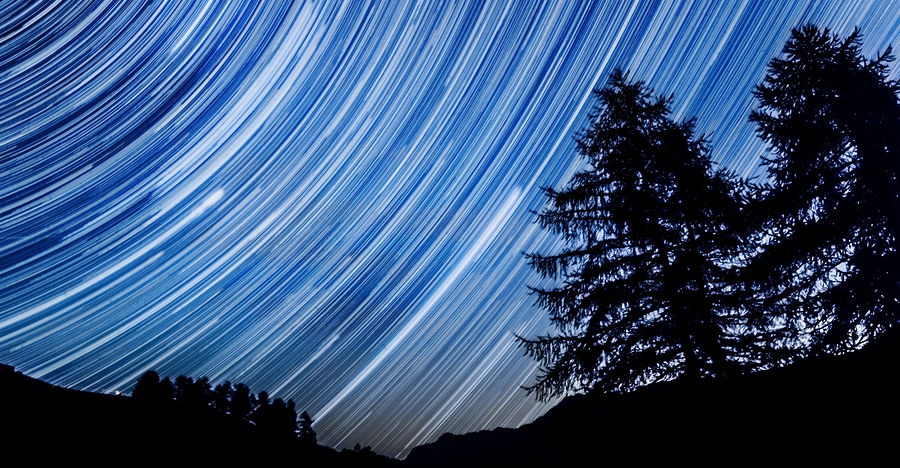
After you get your composition set and the correct exposure dialed in, it is time to get started on shooting the image sequence. If you are using an intervalometer (either in-camera or the cable release variety), you will need to program the interval at which the shutter will open to capture an image. The interval that is set will be the shutter speed plus a little extra time to let the image write to the card and let the camera prepare for the next shot. For every 15 seconds of shutter speed, you will need about 1 second of additional time added to the interval. So, with a shutter speed of 30 seconds, set the intervalometer to a minimum of 32 seconds. Just to be safe, I typically program in a little more cushion, and go with 33 or 34 seconds for a 30 second shutter speed. Once the shooting interval is set, you might choose to specify how many shots you want it to take. I’ll usually go with at least 60 images, but will frequently let it go much longer than that. More images doesn’t mean you have to use them all and you could use the longer image sequence to create a time-lapse video. Just remember that the more images you use, the longer the star trails will be in your final image.
Finally, I almost always shoot in RAW image format so I have more data to work with in post-processing. Although white balance can easily be changed later (especially if you are shooting in RAW), I prefer cooler setting, somewhere in the 3,000 to 3,500 Kelvin range. Setting the white balance in camera will keep it more consistent across all your images.
IMAGE STACKING VS. SINGLE EXPOSURE
There are basically two different methods for shooting star trails: the image stacking method, which we have already discussed, or a single exposure. Shooting a single exposure of say 30 to 60 minutes may seem like a much simpler way to make a star trail image, but there are drawbacks to doing it this way. For starters, the longer the shutter is open, the more the sensor will heat up. A hotter sensor may mean more noise in your image. The weather could also have an impact, as the sensor would be more likely to heat up in the heat of the summer than on a cold winter night. For me, the biggest disadvantage to shooting one long exposure is the increased chance of not getting the shot. If at any time during the long exposure, the camera gets bumped or a wind gust causes slight camera movement, or if stray light contaminates the scene, then the entire shot may be ruined and you have to start all over. This would invariably happen to me 58 minutes into a 60 minute exposure. On the other hand, if one or two 30-second images in a sequence are unusable, you can throw those out and still have plenty to work with. The choice is yours, so maybe try both methods and see which one works best for you.
DEWS AND DON’TS
If you are shooting in the spring or summer months in more humid climates, there is a good chance that dew will collect on your camera and lens as the night air cools. This will create problems if your front lens element becomes covered with water droplets halfway through the shoot. One way to prevent the formation of dew on the lens is to wrap a chemically activated hand warmer around lens barrel to keep it warmer than the ambient air. These can be attached to the lens using rubber bands. Periodically check the lens to make sure it stays clear and you may want to have some microfiber cloths handy to wipe the lens clean if necessary.
Make sure that your batteries are full and memory card is empty before heading out into the night. You will be shooting lots of images and don’t want your battery to die or the memory card to fill up before the shooting is over.
Read the full article over at Improve Photography.
Source: Improve Photography