
This article over at Photography Talk gives you an idea of all the things that affect the depth of field in your images.
It may seem complicated at first, but once you get the hang of it, it’s very easy to achieve either a large or a shallow depth of field.
Start practicing with different apertures and focal lengths and you’ll soon notice you’ll be able to use these tips very creatively, whatever type of photography you’re into.
Aperture
The aperture of your camera refers to the size of the hole through which light enters your camera’s lens. The larger the aperture opening, the more light that’s allowed in; the smaller the aperture opening, the less light your lens will be able to collect.
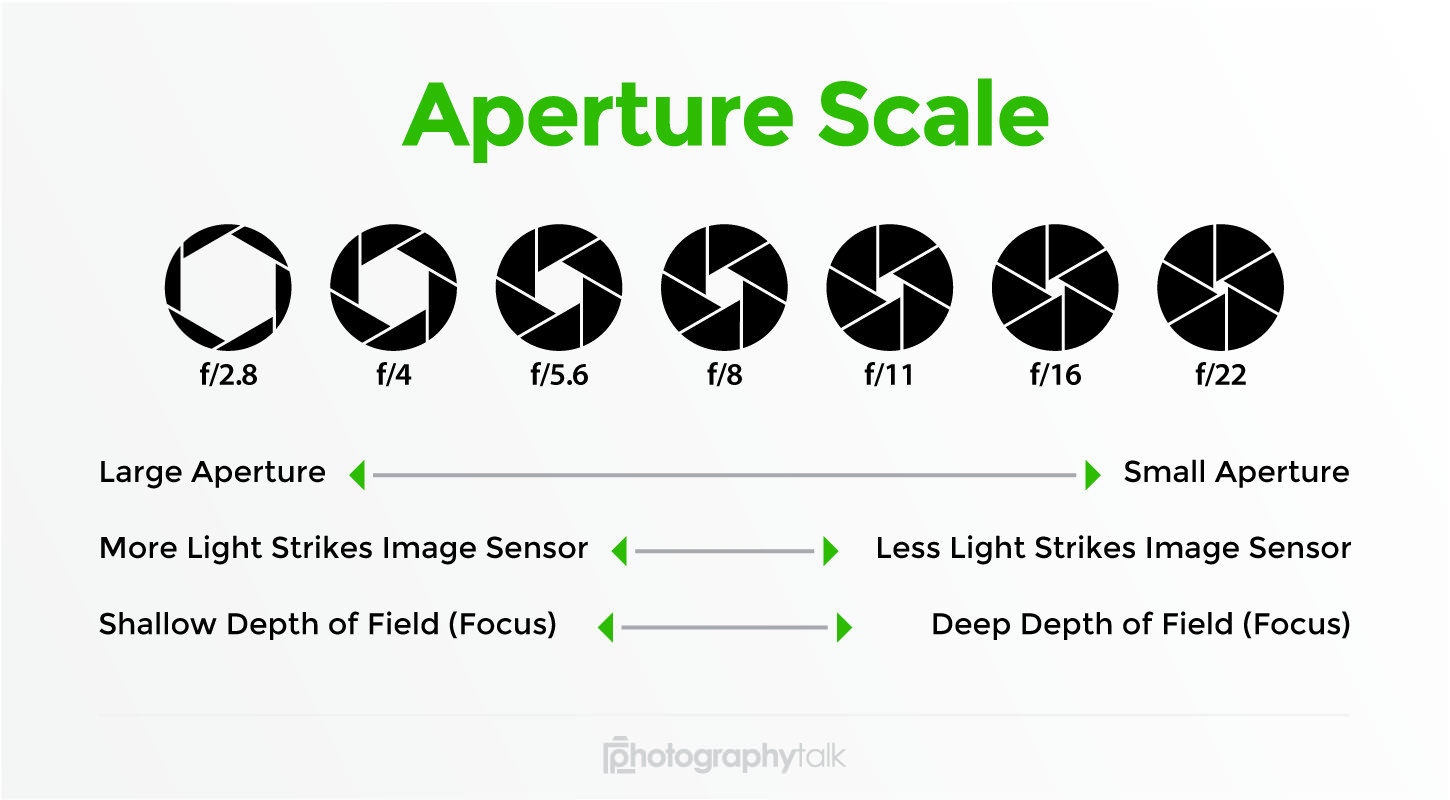
Aperture is denoted using f-stops, which, for beginners is a bit confusing because f-stops are inversely related to the size of the aperture, like so:
Large f-stop number = small aperture
Small f-stop number = large aperture
So, examining the chart above, at f/4 (a small f-stop number) you have a large aperture opening. At f/22 (a large f-stop number) you have a small aperture opening. This can be extraordinarily confusing at first for a beginner to remember, so try thinking of f-stops like fractions:
F/4 would be converted to 1/4; F/22 would be converted to 1/22. Which is bigger? Obviously, 1/4 is bigger than 1/22, so f/4 represents a larger aperture opening than f/22.
Now, the lower the f-stop, the shallower the depth of field. When shooting a portrait, a photographer might use f/2.8, for example. Conversely, when photographing a landscape, a photographer might use f/16 because the higher the f-stop, the larger the depth of field.
Distance
There are two distance elements that factor into depth of field: the distance from the camera to the subject and the distance between the subject and the background.
The closer your camera is to the subject, the shallower the depth of field. So, again, using portraits as an example, the photographer will generally be quite close to his or her subject, thus making it relatively easy to get a shallow depth of field. On the other hand, since landscape photography is generally done from afar to capture the expanse of the landscape, depth of field is quite deep, even if a smaller than normal aperture is used. Consider this:
At a distance of 10 feet, an aperture of f/4 will result in a shallow depth of field with a blurry background. But that same aperture of f/4 at a distance of half a mile will result in a comparatively large depth of field.
The second distance factor at play here is the distance between the subject and the background. In this case, the farther the subject is from the background, the more blurred it will be. In a portrait, for example, placing the model at 15 feet away, with a background at 20 feet away, will result in a background that is more in focus than it the model is 15 feet away and the background is 45 feet away.
In short: The shorter the distance between you and your subject, the shallower the depth of field. Additionally, the further your subject is from the background, the shallower the depth of field.
Focal Length
Focal length refers to the size of your camera’s lens and its ability to magnify a subject. Basically, the longer your lens, the shallower the depth of field will be.
For example, if you’ve got an 18-200mm zoom lens, the depth of field at 18mm at f/4 will be much greater than it would be at 200mm at the same f/4 aperture.
In short: The longer your lens, the shallower the depth of field. To maximize depth of field, use a shorter focal length like a wide-angle lens.
Camera Presets for Depth of Field
One of the simplest ways to manipulate depth of field and still get a well-exposed image is to use your camera’s Aperture Priority mode, which, depending on the manufacturer of your camera may be indicated with an A or AV on the camera mode dial.
Aperture Priority mode gives you control over the aperture while the camera retains control over the shutter speed. Thus, if you want a shallow depth of field, dial in an appropriate aperture, say, f/4, and the camera will select an appropriately fast shutter speed for a properly exposed image. If you want a large depth of field, shoot at f/16 and the camera will select the appropriately slow shutter speed to get a good exposure.
Of course, there are limits to the ability of the camera to adjust the shutter. For example, if you’ve got a very small aperture like f/22 and there isn’t much available light, the camera might struggle to select a shutter speed that remains fast enough for you to hold your camera in your hand. For most people, shutter speeds at or below 1/30 of a second are too slow, or else camera shake ruins the picture. As a result, always have your tripod handy in case you need to slow the shutter significantly.
If you’ve got a point and shoot camera, don’t worry – you can still manipulate depth of field too. If you look on the mode dial on your camera, you should see a little mountain figure. Shooting in that mode – landscape – selects a narrower aperture and faster shutter speed to get you the large depth of field typically required for landscape shots. Look for the little head icon – portrait mode – and the camera will select settings more conducive to a shallow depth of field. These shooting modes are also often found on DSLRs in the shooting mode menu.
In short: Use your camera’s presets – Aperture Priority mode on a DSLR and portrait or landscape mode on a point and shoot – to control depth of field without having to make as many on-camera adjustments.
Read the full article with even more tips over at Photography Talk.
Source: Photography Talk
Image source: Photography Talk